


Ever since I was little I have always LOVED wrapping gifts. I remember one Christmas back in college where I spent almost as much wrapping each gift as I did on the gifts themselves. I am pretty sure my siblings (who were around ages 12 - 16 at the time) did NOT appreciate that and wished I had of just spent the extra money on their actual gifts! Haha! Oh well. Ever since starting Dear Lillie, though, I have been in such a rush that I haven't spent much time on gift wrapping. Well, a little while ago I saw this tutorial and fell in love with the beautiful crepe paper flowers that Janet made. I had never been a fan of crepe paper before but now have completely changed my mind. Anyway, I bookmarked the tutorial and thought I would give it a try when I had some time. Well, last week I had to wrap a bridal shower gift for "Miss Lisa", as Lillie calls her (we are so excited for her and "Coach Ben" and can't wait for their wedding next month!), as well as a baby gift and a few other presents so thought it would be fun to give it a try. It looked easy and inexpensive and I have to say it really was! The crepe paper from Target was $1.99 a roll and I think you could probably get anywhere from 10 to 20 flowers out of each roll (depending on their size) and you can't beat 10 to 20 cents per flower. And they really were easy. However, I switched mine up a tiny bit because for some reason I had trouble making mine look like Janet's when I did the fold in half part from her tutorial. Hers were so beautiful and fluffy and mine kept coming out like this and looked so flat and tight and not nearly as pretty as hers.

I am not sure what I was doing wrong but after four turning out like the one above I gave up and tried doing mine a tiny bit different. Below is how I did mine step by step but you can also check out her tutorial and see which one works better for you. The only part that's different is where you sew your ruffle (hers is down the middle and mine is on the side) and hers are folded in half and mine aren't.
1). First cut three long strips of crepe paper.
(For my largest flower I think each strip was about 3 feet long and for the smaller ones I just made the strips a little smaller. I don't think I made any that were less than 2 feet, though).

2). Stack them on top of each other.

I figured it would be easier to make a whole bunch at once and save them for future use so I think I made around 20-25 of them and first just cut all of the strips and stacked them together is piles.

4) Set your sewing machine to make the longest stitch possible.
Here are the settings that I set my sewing machine at. You can also just hand stitch them loosely and then pull the thread at the end to make the ruffle if you don't have a machine.


5). Now start sewing!

It always helps having some Disney Princesses stickers! We sewed so many of these streamers that Lillie got a little bored with her part of "pushing the pedal" and starting decorating my machine instead.

6) When you are done sewing they should look like this.
They will kind of curl up on their own.

7) Now start at one end and start rolling.
I recommend rolling them somewhat loosely. If you do it too tight it won't look right. It took me a few tries to figure out how loosely to do it.

For smaller sized ones it's okay for them to be a little bit tighter.

But for larger ones I found it works better if they rolled more loosely, like this:

8) When you get to the end just add a dab of hot glue and glue it closed.

9) Now cover the bottom in hot glue.

10) Cover that with a strip or two of crepe paper.
After that trim that down and then cut off any loose thread.
*****PLEASE NOTE: I used white thread for all of mine so that it would show up in the photos for this tutorial but I would recommend using the same color thread as your crepe paper!

Now you should have a nice pile of flowers that look kind of like roses.

11) And now for the final step just pull apart each streamer layer
and "fluff" them and they will look like the flowers below!
If you like the look of the flowers above then, of course, just leave them like that. Personally, I prefer the fluffy peony look a bit better. Then just glue them onto your gift and there you go!


I think there are a TON of other ideas to use them for as well.
They would look cute as place settings at a wedding or party!
(I have quite a few other ideas but haven't had time to work in them yet.)


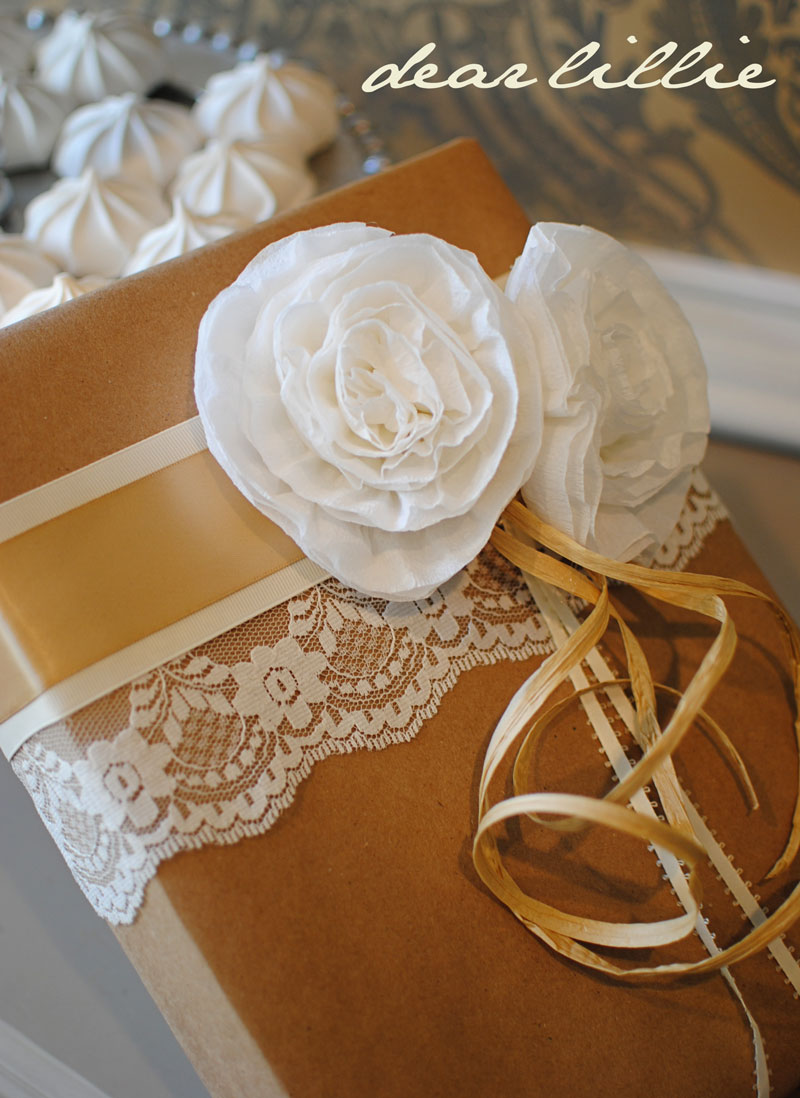
And here are some more photos of some of the gifts we wrapped with them:


I also added some to our wreath out on our back porch.

In our home tour post that we did last Monday for the Poppies at Play Parade of Homes I posted some photos of our back porch. Most of the other photos I used were quite recent (many were taken within the last few weeks) however, the porch ones were from a couple of summers ago. I don't think I took any last summer. We have actually spent the last few days cleaning the porch off and getting it all ready for this spring/summer! We've eaten dinner out there the last several nights. I forgot how much I loved being out there. Because I pretty much just ignore the space from about November through April each year it gets pretty gross so needed a major cleaning. This year along with washing all of the bedding on the daybed I also made a bunch of new pillows and recovered the two chairs. Now I just need to freshen up the accessories out there and then I will post some new photos. In our last house I used a ton of blue and every time now that I see a new piece that Miss Mustard Seed does in blue I completely fall in love with it and then I start missing blue sooooo much! I had a ton of this blue toile fabric left from some old projects in our last house so I used it to recover several pillows and then added in some blue silhouette pillows. That blue ink on the silhouette pillows looked MUCH more muted in the bottle and when they dried they were a million times brighter than I had anticipated. It is too bright for me. I prefer the more muted gray blues so as soon as I have a chance I will be making something different but for now here a little peak of the blue we added out there:

And here is one of our favorite spots in Colonial Williamsburg. Now that everything is starting to bloom I am going to try to take more photos when we are down there. We've had a picnic here four times this past week. Yesterday we went twice. Lillie loves the ducks, geese, turtles, fish and squirrels that live in this little spot. In fact, one of her first questions each morning is if we can go see "Mr. Goose, Mr. Turtle and the Quack Quacks". There is a little bridge over to the left that I will have to take a picture of next time. When we sit there and eat our lunch I like to imagine this is our house. (Oh and don't worry, we aren't just randomly trespassing on some poor person's front lawn. This is part of CW but it is a bit off the beaten path so we often have it to ourselves.)


Just three more weeks until my due date, although I am hoping she will arrive sooner than that. Jon and I still can't agree on a name so if you have any more suggestions please feel free to leave them either here or on the weight/date guessing post. We actually added one to our current list that was left on the original post and talked about quite a few of the other ones.
Oh, and I am still SLOWLY making my way through e-mails. I actually took a couple of days off from the computer last week because I needed a break but have started back working on them and am hoping to finally get through them all this week as long as the new wee ones doesn't arrive.
I hope you all have a wonderful Monday!


Your flowers are absolutely gorgeous! I have only made tissue flowers and have never heard of crepe paper ones. So glad you shared this tutorial Jen! Even the one you said was too tight is lovely.
ReplyDeleteLove those flowers! My name suggestion is Claire. I have a Lillian and Claire.
ReplyDeleteWowza Jennifer these peonies are rocking my Monday! Peonies are my absolute favorite flower!! Great job!
ReplyDeleteThese are just lovely, Jennifer! I'm getting married in October, and I think I will definitely work these into the the decor somehow... :) Thanks so much for sharing the tutorial!
ReplyDeletelove the flowers! i can't wait to try some for myself!
ReplyDeletewhat a perfect spot for a picnic. i bet you got some beautiful photos!
i hope that sweet girl arrives soon!
i know a little girl with the name charlotte- old fashioned and pretty!
This is such a pretty way to embellish a present - like getting two gifts in one! These are so fun and could also be used in lots of creative ways. Thanks for sharing!
ReplyDeleteLyla Rose, Layla Grace, Lucy Katherine, "L" names are really good! My granddaughters are Lucy Gail and Lorelei Kelly. They are just a year apart and are already playmates at the ages of 1 & 2! The adventures of Lucy and Lorelei...a real comic strip, lol! Your flowers are amazing....your daughter is unusually beautiful and I can't wait to see the next cutie!
ReplyDeleteFabulous post! Great information, with lots of good tips to incorporate these lovelies into all kinds of projects. Thanks. Have a great week.
ReplyDeletewww.skylarkmanor.com
Can't wait to try these! They are so pretty. Hopefully, easy and inexpensive. My kind of craft!
ReplyDeleteLove love love the flowers. I have some left over crepe paper and will try making them this week. I also wanted to tell you, I love your photos. All of them. Your blog is such an inspiration to me I just started a blog myself. I hope mine can be half as good as yours. Thanks for the inspiration!!!
ReplyDeleteLove Love Love the peonies. We just found out we are having another girl too and so far the frontrunner name is Campbell. I also like Harper. Maybe we'll use a combination of both!
ReplyDeleteI just heard the name "Elodie", and thought it was precious.
ReplyDeleteLove the crepe paper peonies! Maybe I'll try it sometime when a store bought bow won't do! Hope you are well...not much longer!
ReplyDeletexo
Hana
Here is a name suggestion:
ReplyDeleteEmeline, Emmeline, or Emmaline
(pronounced "emma-line").
Hi Jennifer, Love the flower tutorial! Sophie is another name for a girl if no one suggested it yet.
ReplyDeleteLove the flower tutorial and reblogged here
ReplyDeletehttp://www.nlqg.net/apps/blog/show/6680545-crepe-paper-peonies-tutorial-by-dear-lillie.
My niece had a little girl and named her Finley Nicole....I love her and her name.
The flowers are precious, Thanks for giving such great instructions for making them!
ReplyDeleteCindy
i love these, Jennifer! and i will be making them to adorn gifts for a baby shower i'm planning, as well as using them as decor! thank you sooo much, i was trying to figure out what to use that was different and pretty but less expensive than all real flowers.
ReplyDeleteon a side note: i recieved my fairyland tank and LOVE it. like cannot wait to wear it and will be telling everyone where it's from. thank you.thank you.thank you.
Jennifer,
ReplyDeleteThank you so much for sharing these PRETTY flowers...they will look so good on gifts for my bride (my daughter is getting married in July). I see where someone gave you the name "Claire"...I have a 21 year old "Mary Claire" (she is not the bride)...we named her after both grandmothers.
Blessings,
Linda
Oh my goodness!! These are just so lovely and adorable!! I will be trying these for sure!!Thank you so much for teaching us how to do them! Beautiful!!!
ReplyDeletethose are so pretty and look so simple to make! thank you for showing me the settings you use on the sewing machine! don't know why that is such a big deal, but it so helps me!
ReplyDeleteoff to check and see what names are on the list!!!
Love these! I might have to try some myself! Can't wait to see Lillie & the new wee wee tot!
ReplyDelete-Jamie
What a great tutorial. Thank you for sharing this with us!
ReplyDeleteA few names: Isabel, Cora, Violet, Ivy and Leila.
I'm sure you will come up with a lovely name for your sweet baby girl. My niece is named Lillian. Love the name.
Good luck!
Hi jenni! I love the peonies! My daughters are Ava and Sophia. I love the names Scarlett, Hadley, Harper, Presley, Avery, Blaire. Also I meant to tell you this on the last post. Watch Barbies 12 dancing princesses with Lillie. The names of the girls are all really cute actually lol! I'll be praying for a safe healthy delivery!
ReplyDeleteMorgan
Hi Jennifer,
ReplyDeleteThese are great...I was looking for a tutorial for these - perfect! thanks!!
You should send me some business cards to have out at the sale....
xo+blessings,
Anne Marie
Heard a great name today...Harlowe...Thought it was cute!!
ReplyDeleteSuch a cute flower! I'm going to have to try some of those out sometime. :)
ReplyDeleteThose flowers looks so pretty Jennifer and you made it look so easy too :)
ReplyDeleteThank you for the information even though I coudln't get it done: http://whitecottagechic.blogspot.com/2011/04/greige.htm
ReplyDeleteYour flowers are adorable! I'm new to your blog and I've enjoyed going back and looking at your posts.
ReplyDeleteHow exciting having a new baby girl! Congratulations! Have you thought of the name Molly?
I love our granddaughters names as well. Emma and Olivia. Just food for thought.
Take care and Lilly is a doll!
The flowers are great. As for a name, I will share my daughters' if you would like. Arden.
ReplyDeleteOh my goodnes! THey are gorgeous! Thanks for the step by step, can't wait to give it a try :)
ReplyDeleteXO
Kristin
I know you are behind on e-mails but just wanted to let you know I just sent you one and attached some photos of my copy cat Easter topiary that you inspired me to make. I will be posting pics of my topiary this week and will definately let everyone know I got my inspiration from you and link back to your project. Hope this is okay with you.
ReplyDeleteXOXO!
Judy
Love the purple peonies... may have to try that!! Purple is kinda my thing though! :)
ReplyDeleteThese are so cute, I love them and will defintely give them a try! Thanks for sharing!
ReplyDeleteJodi
My 3 months old is called Anais. It means Grace (French name). All the best to your beautiful family.
ReplyDeleteYour crepe paper peonies are beautiful! I am going to try to make these. Thanks for the tutorial. They are so pretty on the packages. What a gprgeous spot where you have your picnics. I also love your new blue pillows for your porch. Those are lovely!
ReplyDeleteJenni! I love your peonies, and can't wait to try them! Thanks for the idea! You do such a great job explaining things - makes me think I might actually be able to make them! Also, wanted you to know I'm thinking about you and praying for you and baby Holmes - I can't wait to meet her in July!!! I'll try to call you soon.
ReplyDelete~Cathy
wow, those peonies are lovely! can't wait to try making one (though i have a feeling it might turn out disastrously!)
ReplyDeleteWOW! I love these peonies. GOrgeous wrapping job on the presents. I don't even have a sewing machine...shame on me!!! Your picnic spot looks amazing too.
ReplyDeleteJust sensational! You are so clever. Thanks for sharing your talents!
ReplyDeleteAngela x
WOW, gorgeous flowers! Thank you for sharing your unique tips!
ReplyDeleteBaby names: Sutton, Liralyn, Fallon (short "a"), Mia, Ever, Eva, Meredith, Delaney, Sterling, Hollis, Marlowe, Bennett!
April 22, (Good Friday) 7 lbs. 11 oz.
Blessings for a safe delivery!
Those flowers are so pretty! I love all the ways you incorporated them into presents, the table and the wreath. I about died when I first saw the outdoor photos- I thought that was your back yard! So excited for your new arrival! Sending you LOTS of well wishes! p.s. I'm adding your blog to my blogroll- it's become a favorite of mine!
ReplyDeleteI LOVE these! I've made the rosettes before but love these flowers.
ReplyDeleteThese are so pretty! Your blog is just beautiful! Your newest follower, Jenn :)
ReplyDeleteThose are wonderful!... I was just doing a features on using the ruffler attachment for your sewing machine today.. I am totally going to have to try doing it with crepe paper!
ReplyDeleteMaddie- the D.A.
You are my blog crush at http://vintagerevivals.blogspot.com/. I leave your blog up in my browser ALL THE TIME. LOVE LOVE LOVE your ideas, your home, your tutus, your sweet girl, your photography. There is nothing about your blog that I don't love!
ReplyDeleteThank you for letting us be a part of it!
Terri@ http://creativeeyedias/blogspot.com
Hi,
ReplyDeleteLove the flowers,
I have three girls named
Ella Claire
Lillie Anna ( the reason we found your blog)
Molly Elisabeth
I love Charlotte, Amelia or Lucie
Have fun with your two little girls, there is nothing like sisters
Thank you for the wonderful tutorial, I have sewn crepe paper ruffles before but never 3 layers and not for flowers, but I will be now! I love coming here, you are so talented! xoxo
ReplyDeletelovely i blogged these today
ReplyDeleteGreat tutorial and awesome photos.....Just HAVE to share your post with my blog readers!!!
ReplyDeletecute flowers! I'll have to remember that project for my wedding! I've always liked the names: Caitlyn, Avery, Emery, Charlotte, Emerson, and Margaret.
ReplyDeletethank you for sharing how to make the flowers. I loved the tutorial. you made it seem simple so I can actually attempt them now. beautiful photos.
ReplyDeleteyour new follower!
kathryn
www.thedragonsfairytail.blogspot.com
thanks for sharing how you did these,, they are so pretty and elegant looking. Cant wait to try it.
ReplyDeletethanks all are them wonderfulll.....
ReplyDeleteI am so jealous that you have so much green and pretty already, but how nice that it will be so nice out for you to take that gorgeous new baby out for a walk! Those flowers are adorable!
ReplyDeleteWow!!!!! Thank you so much for this post! I am going to get my sewing machine out tomorrow and try it! Your creativity is remarkable!!
ReplyDelete-Tess
Www.cheeriosandtuberose.blogspot.com
Wow, those flowers are beautiful and I never thought to try sewing crepe paper!
ReplyDeleteYour photography is just devine too, I am so inspired by your blog, thank you. xx
LOVE this idea! Great job!
ReplyDeleteThese are so beautiful! I am going to have to make some. Thanks for the tutorial!
ReplyDeletewww.thegunnysack.com
This was a packed full of prettiness post! I love these posies. So easy and a really big style punch! My poackages will look so much nicer now!
ReplyDeleteI'm with you about Williamsburg. We try to go once a year. Either in the spring or at Christmas. It is a magical place. Your pictures make me want to jump in the car and join you!
Yvonne
Thanks for the tutorials & the tours!....Your special lunch spot is beautiful!
ReplyDeleteYour blog is seriously one of my favorites. A must read. Just wanted to pop in and let you know (I don't get to comment nearly as often as I want to anymore...heck, I don't get to read blogs as often as I'd like anymore...but I always make time to stop by Dear Lillie!) Keep up the good work my dear!
ReplyDeleteOK those crepe peonies are wonderful! I can't wait to give it a try...my daughter has a bday party this weekend and I will attempt to make one for the pressie topping.
ReplyDeleteAs for baby girl names..my daughter is Ava, she is 9 and I really didn't know any other Ava's then...now it's crazy, I hear it everywhere we go : ( for me it was between Ava and Audrey and I still love love love Audrey! the other name in my fav's is my Ava's middle name which is Simonne. Vivienne, Maya (pronounced May not My), Maren, Lauren, Sophia. Good luck!
I am going to throw in my suggestion. If we decide to try for another baby, and it's a girl, we love the name Eden. I also love Amelie (french version of Emily).
ReplyDeleteLove the purple flowers on the packages!! what a great touch!
ReplyDeleteWhat a great idea! Im using these in a tablescape at indieinentions.blogspot.com come check it out.
ReplyDeleteWow, your flowers are amazing. I hope you do not mind me sharing your work on my Event Planning blog.
ReplyDeleteWell done!
Your flowers and packages are beautiful. I've been making some ribbon roses similar to the process you have for the crepe paper. I also made something else out of crepe paper a couple of months ago that turned out really fun - I'll show them soon. I think I can use some of your technique here to make them much easier though. Your ideas are just so pretty! You have the most adorable crafts!
ReplyDeleteLove the flowers!! I love how much thought and effort you put into wrapping gifts - they are beautiful! Name suggestions (I am expecting baby #3 in the end of June - probably another girl) My eldest is Madilyn, and my little girl is Claire. Our girl names are Charlotte, Savannah, Caroline and Natalie. I am going to go through your comment section to see what names people suggested - I am always looking for ideas for names!!
ReplyDeleteYour flowers and packages are so beautiful. I have been making some ribbon roses similar to the process you have for the crepe paper. I also made roses with crepe paper a couple of months ago, I really enjoy to do it.
ReplyDeleteOh my goodness!! This is absolutely gorgeous!! I LOVE that packaging and the peonies! I featured this on my blog today: http://vixenmade.blogspot.com/2011/08/brown-paper-packaging.html
ReplyDeleteGorgeous. I have been making these for a few weddings this summer. I made them as name cards for the reception, I included leaves, and I also made the for wedding pews. Thank you for the fab instructions. Check mine out @ handmademoiselle.blogspot.com
ReplyDeleteThank you so much for sharing this tutorial! I'm making them for my little girl's baby shower and it is an beautifully inexpensive way to decorate. I had a trouble getting them to fluff out and look as open as your finished product until I got a little rough with them.
ReplyDeleteCame across your blog from here http://firesidestudio.blogspot.com/2011/07/crepe-paper-flowers.html?showComment=1326303796314#c5510600358428373416
ReplyDeleteand had to check it out cause our newest is also Lillie!
Love the flowers...making ours right now...not as pretty as yours but my girls love them!!
Any suggestions if you do not have a sewing machine???
ReplyDeleteHello Lisa! I think you could just loosely hand-stitch them and it would work in a similar fashion.
DeleteThank you...I am anxious to try these!!!
ReplyDeleteJust found this on Pinterest!...these flowers are so pretty and simple to make...thank you for sharing! And your pictures are such an inspiration ♥
ReplyDeleteHello I am trying to make these right now actually and my machine is not that fancy, but I do have it set as close to your as possible, When Its sewn it does not naturally crinkle up like you show I have to pull one string to get it to tighten and I was wondering what I am doing wrong, lol if I am missing some thing. But thank you for share this I am making them for my daughters tea party Saturday as center pieces.
ReplyDelete-Rachel
No, you are doing it right! On my machine it crinkles on it's own but for some machines once you have finished you need to pull the string to make it ruffle. Have fun making them. I am sure your daughter is going to love them at her tea party!
ReplyDeleteI've tried pulling all 4 strings, but it's still not "crinkleing". Any suggestions?
DeleteLillie - Your flowers are gorgeous. I have been looking all over for a good tutorial for peonies. I am using tissue paper and they are going on a card. I'm not sure how mine will come out. I made some using rick rack but they didn't come out to my satisfaction. I am going to use your tutorial to try and make some from tissue paper.Its thinner than crepe paper so it may not work. If not I'll go to target and try once more!!
ReplyDeleteThanks again for the tutorial.
These flowers are so beautiful! I'm looking for some classy decorations for my daughter's graduation party and for my grandma for Mother's day -(making bouquets). If I somehow add a stem, these will be perfect with the other flowers I'm making. Thanks for the idea - I'm so excited to try making these!! :-)
ReplyDeletethis roses are looking so great..........................to be honest, i cant wait to try it out on any cake decoration. big thanks for the idea
ReplyDelete