HTML Pages Pics


Click to visit our brand new site!
Showing posts with label Tutorials. Show all posts

Monday, June 17, 2013

How We Updated Our Dining Room Chairs


Last week when I got tired of packing I decided to take a little break and do some painting. This will be the fourth place that Jon and I will have lived since we got married. Before each of our previous  moves I painted and recovered furniture and made pillows and did as much work ahead of time as I could, so that when we moved in I would have a head start on each room. This move I hoped to do that as well, but I quickly discovered that with two helpers just packing alone was going to be quite an accomplishment to have done in time! So, I gave up on my grand plans of stripping and repainting multiple dressers and other furniture pieces and making new bedding for Lillie and Lola's new room and just went with the two easiest projects on my list  - quickly repainting the porch chairs and then sprucing up the two french chairs in our dining room. 

Now, if you are wondering why I would bother to redo the french chairs let me show you. About a month or two ago we decided to let Lola start sitting in a chair without her highchair in the set. When we removed the high chair seat part from the french chair we discovered lots of things had been dripping down through her seat and all these lovely stains greeted us:

The first thing I did was remove the seat. This one actually doesn't have any screws so you just pull it out. It does take a good bit of wiggling though seeing how it fits in there very tightly. Our new house is quite dark so I am planning on really lightening it up as soon as we move in by painting all of the walls and trimwork. I am going to do lots of white and grays and so am trying to get away from some of creams and browns we have now. On some of our pieces this won't be possible but I'd like to lighten up as many as I am able to. For these chairs as well as the dining chairs on our porch I painted over the creamy color with Dove White by Benjamin Moore. (I also plan on waxing it but haven't gotten to that yet and at this point probably won't until we are settled in our new place.)


Fortunately they didn't take too long to paint and just took two light coats. I am planning on distressed the white a little bit but haven't gotten to that yet.

Next up was recovering the seat. Although I do like the fabric (and would use it in a bedroom) it wasn't what I had in mind for the seat. I was looking for something more muted with a lighter gray. Unfortunately though I decided to do this last minute so didn't have time to order any fabric online and just ended up running to both of the fabric stores we have here in town and this was the best option I could find that had gray and white in it.

I have changed these cushions out quite a bit. I think this was the fifth or sixth different time I've recovered them. It such an easy and inexpensive way to switch things up and because it's easy I don't have to stress too much if we have a major spill.  You just lay the fabric down with the backside up and then center the seat on top of it upside down.

Then I trim around the fabric leaving enough space to fold it over the sides of the chair and allow at least an inch or two to be stapled.

And then I start stapling.

I kind of fold it like this as I got around the corners. As long as you pull it nice and tight it won't be noticeable at all when the seat is back in place.

And there you have it! Now they look clean and fresh and ready for our new house.


And here they are back in their place at the table:


And if you are wondering why those shots are so cropped - well, because the rest of our house looks like this:


At the end of this week this will be someone else's house and we will be loading up the moving truck - ahhh!

Friday, March 8, 2013

Easy Carnation Shamrock Tutorial and Prints Back in Stock


Well, it has been an interesting week that did not exactly go according to plan. When we found out Jamie was in labor last week the girls and I ran around like crazy and began our journey up to NH within a few hours of getting the call that the baby was on her way. What we didn't account for was Lola getting quite sick on our way here. So, we made it to NH but just got a quick view of the baby at the hospital that first day and then I've pretty much stayed quarantined with Lola at my parents ever since - not exactly how we planned our visit going. =( We even have had to change our plans for returning home. So, not only have I not gotten any snuggle time with my newest niece, I haven't done much of anything at our new Dear Lillie space, or gotten any regular work done either. I took my camera out that first day but haven't since and I've barely touched my computer.

Hopefully Lola will start feeling better soon so we will at least get to hold the new baby a tiny bit before we return home. I had those first couple of posts earlier this week pretty much ready to go ahead of time but then got behind even though I have photos for quite a few more posts on my computer I haven't had a chance to get them all sized and edited. Hopefully I can start playing catchup today!

So, this morning I thought I would show you how to make the shamrock carnation that I used in our St. Patrick's Day Vignette.

 Here's what you will need:

Scissors
Toothpicks
Sharp Knife - I used a Steak Knife 
Carnations - I used four small bunches from the grocery store
Moss - I used a long roll of moss that I found at JoAnn's
Floral foam (you can use the wet or dry kind, I actually made two - one of each, the wet kind is MUCH easier to cut into a shape, but the dry one was easier to stand up and lean)


 First use a pen or marker to sketch out your shape (this doesn't have to just be for St. Patrick's Day. I think it would be nice as a cross or bunny or Easter). Then use a knife to cut out the shape.

Above is the dry foam which was a pain to cut out and below is the wet foam which was MUCH easier to cut. (I actually ended up trimming it down to be a three leaf clover instead of four because it looked better that way with all of the carnations in it, but forgot to retake a photo of it once I trimmed it down to three). 

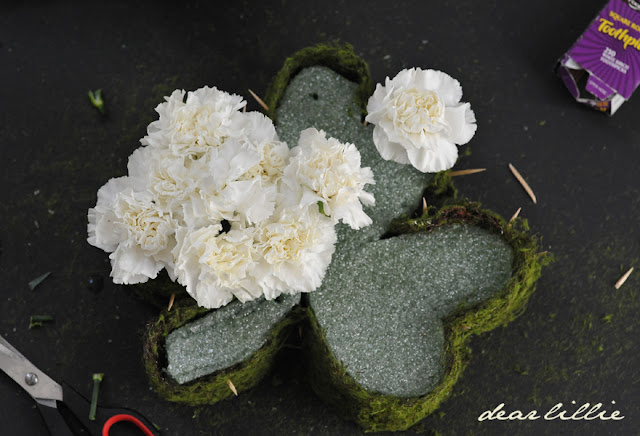
Once you have your shape cut out attach your moss to the foam. Because I wanted to be able to reuse the moss later I just used toothpicks that I trimmed down to hold the moss in place. If you don't want to reuse your moss you could just hot glue it to the dry foam.  In the spots where you can see the toothpicks poking out really far I had not trimmed them yet. It helps if you angle them downward as you are pushing them into the foam.

Now just cut the stems of your carnations down so they are an appropriate length for the depth of your foam and start pressing them in.


Once you have them all filled in it should look like this. If you turn it on it's side you will be able to see some toothpicks (as you can see in the photo below), they aren't noticeable from straight on so you can either leave them be, or you could paint them green to match the moss or hot glue some moss on to them).  

And that's it, now you have a cute little shamrock made from carnations.


I also wanted to let you know we've restocked our "Irish Eyes" chalkboard print, as well as our "Wonderful World" and "I Love You" chalkboard prints.


And we've also restocked our nest pillows

 I hope you all have a wonderful weekend!

Wednesday, February 27, 2013

How To Download, Print and Frame A Chalkboard (Chalkboard Download Tutorial)

PLEASE NOTE: We do not have any affiliation with any printing companies mentioned in this post. There are many places to print large PDF files. The tutorial below is simply a guide to notify our readers and customers of the cheapest and easiest way that we have found to print 24x36 PDF files. This is the method we use to print our own chalkboard downloads. However, we cannot guarantee or stand behind the quality of another company's work--printing results will vary. Also, please be aware that a small number of Canadian customers have had issues uploading via this method.

Chalkboard art is everywhere these days! I am completely fascinated by it and want to keep playing around with it and try to get more creative with my lettering. I know there are a lot of people though, that enjoy it but don't necessarily want to spend hours working on just one quote so being able to download a chalkboard someone else has designed, print it out and pop it in a frame is a great alternative - especially if you like to change your art our seasonally or for different holidays. We just started offering our downloads a couple of weeks ago so only have a few options right now in our shop, but we have several more that are almost ready to go and a whole bunch more ideas in the works. Hopefully within a few more months we will have a wide variety for you to choose from for a whole bunch of different themes and events. 

Anyway, I've been promising to show you how I've been swapping out the chalkboard prints in this frame for the past week or two and finally was able to get it all written up last night so here it is!


Here is what you need for this project:
1 24 by 36" chalkboard print
Painters Tape
4 pieces of wood for the frame ( to work with these prints I recommend using two 28" long pieces and two 33" long  pieces)
1 large piece of wood (to work with these prints I recommend 24 inches by 36 inches)
chalkboard paint (optional)
stain (or paint) for frame
screwdriver
mending braces (I used 2" by 1/2" ones - there is a photo below of the exact ones I used)
screws (size 8 by 3/4 - I used a total of 6 - there is a photo below of the exact ones I used)

First, I am going to quickly show you how to upload the file online the Staples website. If you already know how to do that you can just scroll down and I will show the rest of the steps. We've gotten quite a few e-mails, though, asking how to do it so I thought it would be helpful to show step-by-step because it's hard explaining in an e-mail. I am sure there are other places that print engineering prints but I always use Staples. I actually don't use them for any of my other printed things, but for these engineering prints their price is great (a little over $3!) and it's easy to upload and then just go pick up the next day.

So, when you get to their website look on the left sidebar and find "Copy and Print" and then choose "Banners & Signs, Engineering Prints, and Oversized Prints":

 That will bring you here and click on "Engineering Prints":

Once you are there select the 24 by 36 size (if you forget it's okay you will be able to switch it later) and then click on "Design Now":

Now click "Add Files":

  then click "upload files" and choose wherever it is you downloaded your PDF file too then just click on that file:

Once it shows up click on the upload button (this is one of our Easter ones that we hope to have ready to go early next week!):

 Once it's loaded on the left side click Media and make sure you have the correct size and then click OK then click on orientation and make sure it's going the correct direction for the file you have uploaded. Then just add to cart and you are good to go! I always choose the option to "Pick up" vs. have it mailed to me and it will prompt you to choose the store nearest you. I didn't show those steps but they are easy enough to figure out.

Now that you have your print it's time to make your frame!
(some of the frame images are from our original make your own chalkboard tutorial).

Here are my boards. I had them cut to size at Lowe's. I used 1 by 4's (which are actually about 3/4" by 3 1/2"). Make sure your board that is going to be for the chalkboard is slightly larger than the size of your frame opening.

The first thing I did was paint my board with my chalkboard paint. PLEASE NOTE: this is not necessary if you only plan on using chalkboard printouts in this frame. Even though I already had two other framed chalkboards when I was making the new one sized for the prints, I still went ahead and painted the board with chalkboard paint so I would have the option of using it as a regular chalkboard later if I wanted to. 

While your paint is drying you can put your frame together. Here are the braces I used.

Just put the four pieces together and use the braces at each corner. I just used one on each corner (for a total of four) because I was doing it quickly. It was sturdier than I expected but if you wanted it to be extra secure I would recommend doing two braces on each corner for a total of eight.

Then either paint or stain your frame. I have made a few of these now and have stained two and painted two. So here is how it looks at this point (this is actually the first one I did not the most recent one as you can see from the Christmas tree in the background):

Now lay your frame down with the front side facing down:

Take your board and using painters tape (so that it can easily be removed without ripping the paper) start taping down the paper to the large board.

You can use as much or as little tape as you'd like. This is about how most of mine have looked:


Now flip it over and place it face down on the frame (I painted both sides of this board so I'd have more space to write new chalk art on):


Now it's time to attach the board. These are the screws I had on hand. There is probably something better you could use but they were the right size and they worked fine. FOR THIS PROJECT I ONLY USED SIX and put them in relatively lightly if that makes sense.

I just screwed them chalkboard onto the back of the frame. One in each corner and one in the middle of each of the longer sides. If you have a drill it will make it a little quicker but it's still pretty easy with just a good ol' screwdriver! This is an image from the tutorial a few months ago and for the permanent chalkboard so I screwed them in a little tighter. For this one (which I forgot to take a picture of) I did it a little looser so they'd be easier to quickly take out and just tape on a new print and pop the back right back into the frame. I have done it now about 6 or 7 times and it's really quick and easy!

 I just leaned mine up on my mirrored dresser but if you wanted to hang it you could always attach something so it could be hung!

And that's it! 


I hope you all are having a lovely week! 


Related Posts Plugin for WordPress, Blogger...