HTML Pages Pics


Click to visit our brand new site!

Monday, January 30, 2012

A Chalkboard "Wall"

This post was written a few days ago, but automatically set to post this morning. Other than this, we will probably not be able to respond to any emails, FB posts, or any other things for a couple of days. We ask that you please keep our extended family in your prayers.


I have been in love with all of these chalkboard walls I have seen over the last couple of years. One of my FAVORITE ones by far is Jennifer's over at The Old Painted Cottage.  Anyway, as much as I wanted one I couldn't figure out where we could put one. Because we live in a townhome that has a pretty open floorplan we just have a few huge walls and not a whole lot of smaller ones. Because I couldn't find a wall that would work, I pretty much just gave up on the idea for a while. Then recently I thought it couldn't hurt to try it on the end of our island cabinets. It was the perfect spot for Lillie to be able to reach and draw on. So, we gave it a try! At first we painted the end near the dining room (those are the photos shown in the step by step part) but when you walked through the front door you immediately saw it and it was a bit jarring. After starting at it for a week or so it just kept driving me crazy so I ended up painting back over it and hanging the IKEA rod with the basket and painting the other side with the chalkboard which I like so much better! 

Anyway, here is how we did it:

First, find a fun little helper and get some chalkboard paint. We got ours at Ace Hardware but I am pretty sure you can get it about anywhere. Then we just used a paint tray, a little mini roller, some tape and little brush.

Then we taped off the trim and put down a towel.

And then we started painting.

And in case you think that the photo above is just for the blog take a look at the first coat - haha!
Once she went to bed I added a second coat to "clean it up" a bit.

In the end, though, we ended up painting over it entirely and we painted the other side instead, which I like so much better!


And here is the other side which we painted back over and added these IKEA rods to.


I hope you all are having a splendid Monday!


Saturday, January 28, 2012

Some Valentine's Silhouettes and Three Winners

Lillie was being really silly and playing around with some of our straw hats yesterday afternoon. Seeing how she's been a lot more cooperative lately when I take pictures I thought maybe I would have success again. As soon as I got my camera out though I got her "I do not want my picture taken" look. Oh well. I did get one where she was sort of smiling that I am going to use for a photoshop tutorial and then decided not to push it.

I also spent quite a bit of time yesterday cutting tons of these Little Girl Holding a Heart Silhouettes. We will be having them in both black and pink and in both this small size (approximately 3 1/4" tall by 2 1/4" wide) that would be great for making valentines or decorating and a larger size that would be fun to frame. I am hoping to have them available either Monday or Tuesday.


 You can find the recipe for making these Chocolate Peanut Butter Balls in this post here.


And now, on to the winners of our Baby Cloths and the Two Briar Hats!

First, the winner of the Baby Cloths!


And now for the two winners of the Briar Hats!


Send us an e-mail (dearlillie@hotmail.com) with your shipping address and we will get your prizes out in the mail to you ASAP!

I will be back Monday with our kitchen chalkboard project.

I hope you all have a wonderful weekend!


Friday, January 27, 2012

A Quick Friday Hello


Whew! I can't believe it is already Friday. This past week my sisters Dana and Jamie, our friend Christine, and Jon's dad all were in town to visit. Needless to say it made for a very busy week. I didn't take any pictures at all with my "real" camera while everyone was here so I don't have any photos to show, but I did want to share with you all though, a photo Jamie took of super easy and delicious Peanut Butter Chocolate Bars she made last week at home and then again with Lillie while she was here visiting.
You can find the recipe over at The Girl Who Ate Everything.
We aren't big coconut fans here so we did it without the coconut.

Although I didn't get any photos taken while everyone was here, yesterday I finally photographed our little chalkboard paint in the kitchen project as well as some new additions to the dining room (a little shot of that is below). I can't wait to get them all edited and show you all next week!

Sorry for the short post! I will be back either tomorrow or Sunday to announce the winners of the baby cloth and briar hat giveaways! And then I will have the kitchen and dining room pictures ready for next week. And possibly a couple of new projects in Lola's room to share as well if I can get those photographed today or tomorrow.

I hope you all have a wonderful weekend!


P.S.  We had sold out of both the white and cream Ruffled Heart Pillows. We probably won't be restocking the white ones in the near future but we did just restock the cream ones this morning! 


Wednesday, January 25, 2012

A Giveaway In Honor of little Benjamin Oliver

On Monday, my cousin Cathy and her husband Jason welcomed their newest son, precious little 
Benjamin Oliver! 
I cannot wait to meet him and snuggle with him. In honor of his birth I thought we would give away a set of our baby cloths, which are available in our shop!
  So, how can you win?

All you have to do is leave a comment on this post!
Even if you don't have a baby these would make a great gift!

You don't have to have a blog to enter, either. If you aren't a blogger, just enter a comment and then where it says "comment as" scroll down near the bottom and click on anonymous. However, if you do that, make sure to leave your e-mail address so we can confirm that you are the winner. If we draw the name of someone who doesn't leave any identifying information we will simply draw a new name. Make sure to check back here on the blog to collect your prize!

You can comment each day if you would like to up your chances!
For extra entries become a follower of our blog, twitter
and/or  like our facebook page!

Just write "follower" as a second comment so it counts as an entry,  and "twitter"
and "facebook" as their own entries.

And for one more extra entry: 
 "share" it with your friends on facebook and come back here and let us know you did!

You can enter this contest through Friday night and then this weekend we will announce the winner. 
We will announce the winner of the Our Briar Hat Giveaway then too. You can enter that giveaway by clicking here
Have a wonderful Wednesday! 

Monday, January 23, 2012

Painted Curtains and Pillows for the Master Bedroom

Well, I finally got my pictures uploaded of the curtains and pillows we painted a couple of weeks ago for our master bedroom. Believe it or not the white "curtains" we had hanging up there for the past three and a half years were just white twin sheets. I had them hanging like curtains so I don't think anyone knew, but it always drove me crazy. I never could find exactly what I was looking for, though, in my price range.

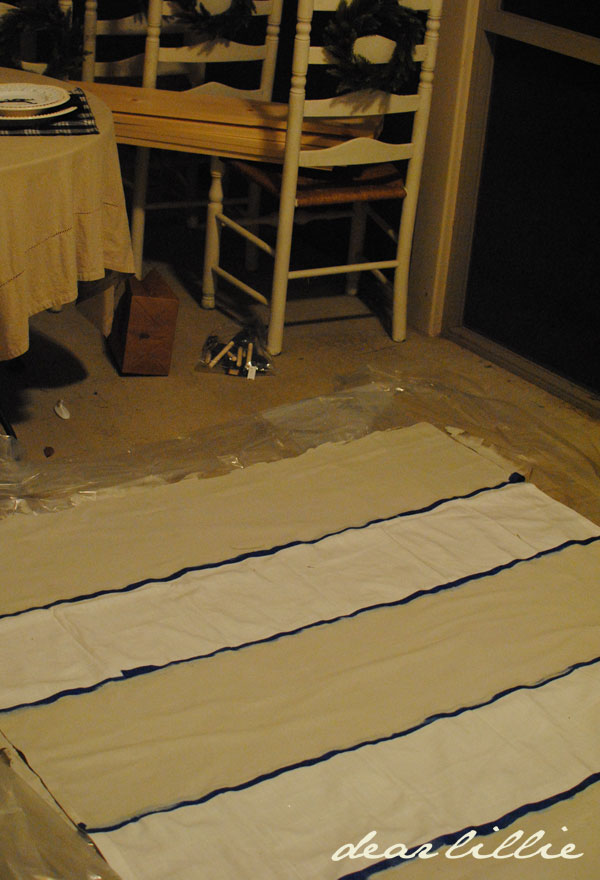
My sister, Dana recently moved and got a new job in New York and got to decorate a new apartment with her best friend, Christine. It turned out fabulous and I hope at some point I will be able to take some photos to share with you all. Anyway, when it came time to make some draperies she sent me a link to some fabric swatches that she was interested in but wasn't quite sure about. I agreed that although they were all pretty none of them were quite right for her space and suggested a stripe. I thought the bold look of a wide stripe would be a nice contrast to the otherwise soft room she was designing. It turned out finding a decently priced striped fabric that would look right in her apartment was not an easy task. I mentioned that I had seen on Pinterest some painted curtains but wasn't sure where. She found some links and decided to go ahead and give it a try. She bought two long white panels at IKEA and painted away. When she sent me a phone picture they were GORGEOUS! I fell in love with them and had her pick me up a pair of the same panels at IKEA and she sent them back down with Jason after Christmas. I used leftover paint from Lillie's room (London Fog by Benjamin Moore) and decided to go ahead and give it a try. I was in a hurry so I didn't bother to look up any tutorials but basically what I did was just used painters tape to tape off every 12 inches or so and then painted away. If you do want to find a full tutorial for this idea here is one from Shaunna at Perfectly Imperfect. I LOVE her blog!

I did two coats heavy coats (I didn't want the stripes to be see-through at all) and then ripped off the tape and that was it! It was pretty time consuming taping each panel off, but other than that it was really easy and I have to say I am so happy with them! And seeing how I used paint I already had they only cost me $24.99! (Or whatever the IKEA curtains were...I think it was $24.99, but I will check with Dana and make sure that is correct).
 I moved all my porch furniture aside to make room so I could lay each panel down. I had to do one at a time because of the space it took up. Oh how I wish we had a basement! =) 

After they were dry we pulled the tape off (Lillie loved that part!) and hung them.


I also played around with the pillows on our bed a little bit. First I brought back up the bolster pillow. It was in the garage after the girls did some damage to it =). I fixed it back up, though, and added a little panel with some new words on it that I was playing around with. We are hoping to have a bolster designed to sell soon. I also used the sheets that used to be our curtains to make pillow covers for our Euro shams on the back of the bed. You can see them below on the all white side that has a little ruffle in the center.


I made the Euro Shams reversable. On the other side I painted on thick strip down the middle using the same paint as the curtains. Once again, Lillie had lots of fun ripping off the tape once the paint was dry.


Here is one side of my extra sheets that were once curtains and now are pillows. 


And here is the other side:

Neither side is perfect but seeing how they go behind everything it doesn't really matter.

I didn't like mixing the gray stripes with the black on the other pillows so when I switched them to this side I removed the black pillows. I was a little torn on which look I liked better at first but now I am pretty sure I like this softer gray look better. What do you think?


While I was taking photos of our bedroom, Lillie made me these little Valentine's and wanted me to take pictures of them. =) 


And here is my little rascal doing a dance move on the trunk in front of the new curtains.

I also wanted to let you know that we have two new Valentine's pillows available in our shop today! Well, actually they don't need to be specifically Valetine's pillows. I have used the ones I made last year in Lola's room year round.


 And we also have a Ruffled Heart Pillow in White:


That's it for today! I hope you all have a wonderful Monday!


Related Posts Plugin for WordPress, Blogger...