Check out more of our tutorials here!
First, we want to thank you all from the bottom of our hearts most importantly for all of your prayers but also all of the kind comments, e-mails, texts about precious Blake. They have meant so much to us.
We plan on getting back into a bit of routine now and hope to have several new items ready in our shop in the coming weeks. We have several new items that are in production right now. This morning we have a new set of pillows available and at noon we will be offering another batch of our growth charts. We started working on the pillows shortly after Christmas and had planned on offering them in mid to late January. We got a little behind on things though but they are finally ready to sell. Although we think they would be a great Valentine's gift, they also are a great sentiment year round to have! For any of you that bought our Silent Night/Holy Night Set over Christmas these would be a great replacement for those for the rest of the year. And they also would make a fun anniversary or wedding gift! The photos on our website were taken at night but I hope to take better shots to replace them today and once I do I will share them on the blog.
We are also excited to announce that we will be hosting our first ever link party on Monday! We don't plan on hosting them regularly but figured it would be fun to have one for special occasions like Valentine's Day. So, on Monday get ready to link up any Valentine's related post you have been working on and later in the week we will showcase a few of our favorites!
Okay, and now for a tutorial on how to add actions and textures in Photoshop.
This tutorial is done using Photoshop CS5.
I seem to get all of her laughing and grinning from ear to ear shots with my phone these days and they are too pixelated to do anything with. Then once I get my "real" camera out I get the "no more pictures look" =) I actually did get some of her laughing with my real camera this day but I had my shutter speed too slow and so they were all too blurry to do anything with. =(
Step 1: I open the photo I want to use. For this photo I decide to clone out the stairs and make a solid background to start with. I use the clone tool on the toolbar on the left (the ninth tool down on the screenshot below) and start getting rid of the stairs.
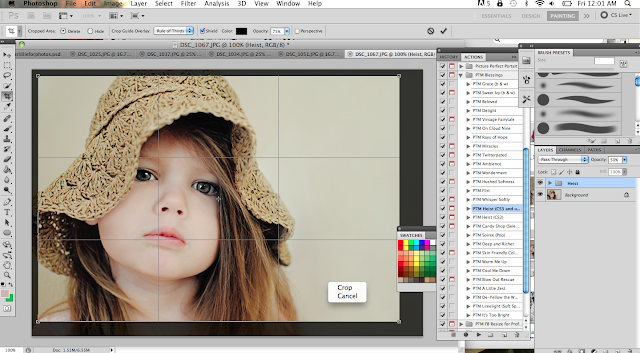
Step 2: Once I have removed the stairs I crop my photo using the fifth tool down on the left (you can also use the second one down).
Step 3: Now that it is cropped and I have it how I want it I will run an action. For this photo (and all of the ones shown at the top of this post) I used Paint The Moon's Heist from Annie's Blessings Set. This is one of my favorites and I use it regularly. I also have to say Annie is such a pleasure to work with! If you haven't already I HIGHLY recommend checking out her site.
Step 4: For this particular photo after I run it I decide I want to adjust the settings some as it is a little too harsh on this photo.
Step 5: The first thing I do is bring the blue wash layer (you can see that highlighted in the bottom right area of the screenshot below) down to about 8% opacity.

Step 6: I play around with a few other layers just a hair and then close that up. I then click on the whole Heist layer and take the opacity down a bit. I think I took it down to around 50 or 60%.
Step 7: After staring at it a bit, I decide to crop it just a tiny bit more. (That tool is the fifth one down on the toolbar on the left).
Step 8: After that, I flatten the image and save a copy of how it looks now (I always keep the original photo too).
Step 9: Now it's time to add a texture. For this I use a Vintage Screen by Florabella. I simply place the texture over my image.
Step 10: For this particular image I used the overlay option (as seen highlighted in the bottom right area of the screen shot below). I generally play around and decide which option works best for the image I am working on.
Step 11: This is what it looks like once it has been applied.
Step 12: Now there are a lot of different ways to fix how the coloring looks on Lillie's face (yikes!) but the option I used this time was just simply the eraser tool found on the left of the screen shot below - the 11th one down. I choose a large brush option and about 50% opacity. Quite often I go even lower than that sometimes even down to about 10% and just play around until I get it right.
And there you have it!
I also really love the Whitewash Texture by Florabella which I use quite often.

I hope you all have a wonderful Friday!


Wow! You sure know your way around PS. That is amazing. On a different note I wanted to say that I come from a family of funeral directors. The one thing that my father always told me was this. When someone loses a family member there are many people around catering to them, praying for them, bringing meals, which is a necessary part of the process. But when others move on with their lives you be the person who remembers and prays for them 6 months down the line, a year, etc. I will keep your dear Blake in my payers for a long time.
ReplyDeleteMC
Thank you for sharing. Your daughter is darling.
ReplyDeleteThese pictures are too cute!! Thanks for giving us that great tutorial. My prayers are with your family Jennifer.
ReplyDeleteI love all of your tips. Your photos make me want to get photo shop ASAP!
ReplyDeleteWonderful tutorial. Your family will continue to be in our thoughts and prayers. Bless you all.
ReplyDeleteWe have all talked about Blake in our house and will not forget him. Watching you use PS is so fun~I would love to get it and start trying effects.
ReplyDeleteI so appreciate your photo tutorials. I am the ultimate beginner with photography and editing/enhancing. I don't even have photoshop on my computer... but I have a corel program that uses many of the same features that I have been trying to master. I know I have told you this before... but I LOVE your blog. It is so you as well as helpful and inspiring. Your children are beautiful. And I know beautiful. I have ten beautiful grandchildren of my own that I want to capture in film. Thanks for helping.
ReplyDeleteThank you so much for making the instructions SO easy (i.e. "tenth button down" etc.) that maybe even I could try a variation on it. I only have the PS Elements but I guess some of those effects would work on that program too. I look forward to your party on Monday!
ReplyDeleteI love your photography and photoshop skills. It boggles my mind when I see the photoshop screen shots lol. Looking forward to seeing your new items! My Dear Lillie inspired nursery is coming together nicely =) I'll be sure to let you know when it's done so you can check it out! I only have a few sneak peeks on my blog so far...still some sewing left to do =)
ReplyDeleteBeautiful photos, and the tutorial is fascinating. I would love to learn how to use photoshop, i've thought about getting it, but would definitely have to come back and read all of your tutorials to figure it all out! Lillie looks so beautiful, and it's like i can see her growing up before my eyes!
ReplyDeleteCindy
Ohhh...such a beautiful girl!!!♥♥♥ The pictures are great, i think i want to try photoscape too, have a nice weekend, Love from Germany, Biene♥
ReplyDeleteWow, great job! This photo looks gorgeous! I just read your previous post. I am soooo deeply sorry for such a loss. I can't even imagine. Lots of hugs to you all. xo
ReplyDeletehi! I am use to using Picnik for my photo editing tool and now that it is going away I was considering going for photoshop software, I have a Canon DSI and a Dell laptop..any suggestions as to what photoshop a beginner should start with?
ReplyDeleteThanks
Hi Cara, I would recommend starting with Photoshop Elements. Its considerably more affordable than CS5, and although I've never used it, my sister owns it and I'm pretty sure she can do that vast majority of things on it that can be done in CS5. It's definitely worth playing around with that before upgrading to CS5.
DeleteI have also been using Picnik to edit all the photos for my site but now that it is going away I have been trying to decide whether or not to break down and purchase photoshop or not. Since I can deduct it as a business expense I will probably go ahead and get it ... I'm just so scared that I won't even know where to start when I open it up and that I will have expensive software that I can't use! I think I am probably going to do the photoshop elements to start with as well and then take it from there.
ReplyDeleteP.S. Your daughter is beautiful!
-Pamela, InspiredByFelicity.blogspot.com
Please, please, please offer more of the pillows!!!!! I wasn't lucky enough to get them before they sold out :-(
ReplyDeleteThey were fabulous!
Thanks! And don't worry, we will have more available ASAP!
DeleteHello there, I discovered your blog via Google whilst searching for a comparable topic, your web site got here up, it seems good. I have bookmarked it in my google bookmarks.
ReplyDeleteHurley Girls 4-6x Vinyl Dreams Slider With Beanie
You have a little star there shining brightly.
ReplyDeleteThank you SO much for this fantastic tutorial. I'm definitely going to use this next time I upload photo's.
ReplyDeleteYour little one is BEAUTIFUL!
I just wanted to come by and say HI Jenni! I hope you and the girls are doing fantastic. Lillie is getting so big and grown up. I can't believe it. SHe looks gorgeous in these photos. Hope your having a fabulous weekend friend
ReplyDeletexoxoxo H
There is obviously a bundle to identify about this. I think you made certain nice points in features also.
ReplyDeleteSorel Women's Cate The Great Boot
What a fantastic tutorial - I can't wait to have a spare hour or two on the weekend to have a play with it! I just stumbled across your lovely blog & have signed up as your latest follower! I look forward to popping back for some more gorgeous inspiration.
ReplyDeletex
Melissah from Country Style Chic
Dear Lillie I just love your blog! I read your message about venting and would like to say you are a amazing woman with all you do. I enjoy the pictures of your home and family. Thank you for taking the time to share with us. I stop in a couple of time a week to see what new! Someday i would like to buy something but for now I just look at all the beautiful things
ReplyDeleteThanks for sharing! I have Corel, so am looking for ways to make the same effects? Your daughter is a little angel <3
ReplyDelete