


So, here is what we are going to do today:

In the photo on the left I liked her little smirk but not the people and cars in the background. In the photo on the right there weren't any people behind her head but she was pouting. 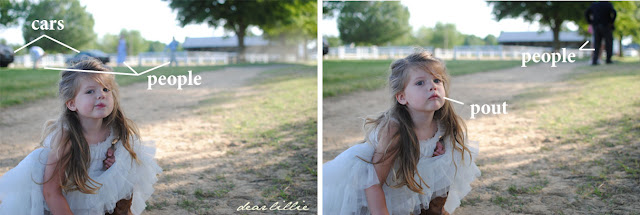

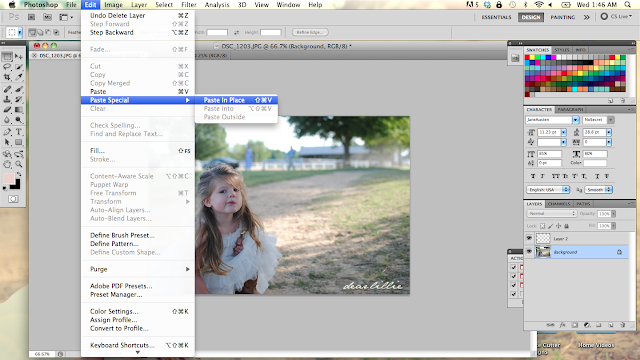
Step 1). I opened both photos in photoshop and selected the top portion of the pouty picture.

Step 2). I clicked on Copy. This is under Edit. I generally just use the shortcut though by holding down the command button and clicking on the c (and if you hold down command and hit p it will paste)

Step 3). Paste in Place. (Or just paste)
Step 4). I moved the pasted layer around a bit to get it where I wanted it.

Step 5). Next I chose the eraser tool and selected it in size 60 and 0% hardness.

Step 6). I then chose the opacity to be about 60%.

Step 7). Now I start erasing the harsh line that connects the two layers. If you look below you can see on the top left where I have done that and then still have yet to do it on the rest of the rectangle.

Step 8). I continuing using the eraser until I make my whole way around the rectangle working especially carefully near Lillie's hair area to make it look as natural as possible. I also had to erase the area near the barn roof so it didn't extend too long and look warped. Because of that the man in the original background image showed through. We will clone him out in the next step.

I forgot to take a screen shot of this when I did this last night but quickly did this today so you can see (so it might not match up perfectly - I didn't save the one I was working on last night). If you turn off the background layer this is what the top layer looked like when I was done with it.

Step 9). Now we are going to flatten the image. To do this right click on your background layer and choose "Flatten Image".

Step 10). I now choose the clone tool (circled in pink) and then find and area I want to use to clone over the man. I hold down the option key and select the area circled in pink and then clone it over the man.

Step 11). Now I make Lillie's eyes pop a tiny bit using Pioneer Woman's Bring on the Eyes action. (I plan on doing another tutorial for eye-popping and touching up skin soon - hopefully next week!)

Once I am here I make sure to click SAVE! From that finished image I can now run several different actions over it. You want to make sure you keep this image, though, before you run any of the fun actions over it.
Step 12). Now I could stop there and then just add a colorful action on top but for this image I wanted to add a lens flare. I chose the Sun and Lensflare (Right) option from Florabella's Spring Set I.

Step 13). Now I flatten the image by right clicking on the background layer.

Step 14) I then ran Paint the Moon's Warm Honey Action and then played around with the different layers to get it how I wanted it.

Step 15). And lastly I flattened it again and ran Paint the Moon's Rainbow Bright Action from her Sublime Set.

And there you have it!
I also wanted to introduce our newest sponsor:

Hometown Girl is a wonderful blog written by Susan Duane. Her western New York home was featured on Houzz.com. I am in love with her home and would be lying if I didn't admit a was jealous - this is the kind of home I dream about owning someday. It just oozes with character!

Photo by Susan Duane
Susan is now a contributing writer for Houzz.com and featured our home there earlier this year.
I hope you all will head on over and check out her blog!

Have a fabulous Thursday!

Holy cow Jennifer, this is way cool. I've still not purchased Photoshop, but I'm always blown away at what can be done with it. Your photos have me wanting to learn more about photography :)
ReplyDeleteLove the final picture! I'm super impressed with your photoshop skills! I don't understand half of that tutorial, but perhaps I can try to learn a couple of those steps! :) Would you mind sharing which lens you use for your interior shots? I LOVE the pictures of your house . . . and while I'm still a long ways off from taking such beautiful pictures, I'm in need of a new zoom lens. I left mine within reach of Carolina Girl and well, that was the end of that lens. :) Thanks, Jenni! I hope you guys are doing well!
ReplyDeleteHey Allison! How are you doing? How's your summer going? Maybe we will bump into you tomorrow at the Farmer's Market. I have two lenses. The one that came with my camera (a Nikon D3000 - 18-55mm f/3.5-5.6 VR lens) and then I have a 35mm 1:1.8G lens. I use that for all of my closeup type shots and then the other lens for the full room shots. I have been pretty happy with both but am hoping to upgrade at some point in the next year. Those were both relatively inexpensive (as far as lenses and cameras go) but I would say for their price have been definitely worth it! I know the feeling of having a lens ruined. Lillie and Jon were goofing around when we were out to dinner at the beach last summer and spilled a soda all over my closeup lens and ruined it completely too! Ugh!
DeleteHope you have a fabulous weekend!
Hi Jenni - thanks so much for the lens info! It was my 18-55mm one that broke . . . but mine didn't have vibration reduction - I think I'll "upgrade" to include that when I purchase the replacement. It will definitely help with the low natural light in some of our rooms {that drives me completely crazy}. Kev & the girls just gave me a portrait lens for Mother's Day and I am in love with it!
DeleteOur summer is going well! I hope yours is too! We've been loving the amazing weather up until this past week - now it's a little hot! We are heading out to the Farmer's Market soon - hopefully we'll see you guys there! I'm still giggling about the flamingo that Jon won - so curious where Lillie has been keeping it - ha!
We have that same non-existent natural light in our house! It drives me insane! We went to the Farmer's market too but we are always so late. Haha! We are always getting there as everyone else is leaving. It was so hot this week! I am missing all of that amazing weather. Lillie's got the flamingo in her room. It's literally taking up half the space. The worst part is I have no idea how I am ever going to get rid of it - haha! We should have thought it through a bit more before having Jon take the shot. =)
DeleteJenni, you are so amazing! i only have PSE 10 so not sure if i can do the same with it. thanks for the mention!! susan
ReplyDeleteApproximately how much does Photoshop cost?
ReplyDeleteHi - There are several different versions of Photoshop, with a wide range of prices. They can be found at Adobe.com.
DeleteVery cool! I would have never thought of cutting and pasting a whole section! I have learned how to head swap, but oh my can that get tricky!! Thank you for sharing!!
ReplyDeleteI've been using ps for 9 years and every version gets better and better.. you did well with your overlay.. spot on even..
ReplyDeleteJust pinned your tutorial. I'm not very good at Photoshop just yet but I'm sure I will need it some day. Thanks!
ReplyDeleteJenni, this is just lovely- I always clone stamp EVERYTHING I need to change, but I love the idea of taking a huge portion of the other pic, and eliminating a bunch of work. GREAT tutorial!
ReplyDeleteWhat a beautiful picture of Lillie:)It is amazing what you can do with photoshop, you made it seem so easy. I love Susan's home too, it is stunning & it has so much character. She is so talented & have enjoyed her blog, glad to see her on yours.
ReplyDeleteWarmly,
Jen
You are so talented. Photoshop is still like a foreign language to me. Even with walk-throughs. I am going to try this. Wish me luck!! Much love!!
ReplyDeleteThat is an amazing tutorial that I will be saving for later!
ReplyDeleteThank you so much for this, Jennifer! I have been wondering how to switch an active dog to a sitting dog in our group shot of the whole family at my daughter's graduation from UVM. This is perfect ( IF I can do it.....)
ReplyDeleteWhat a wonderful tutorial! Do you mind sharing what version of Photoshop do you have and what type of camera and lens do you shoot with? Also, do you use Lightroom for any of your pics?
ReplyDeleteThanks! I use Photoshop CS5. I use a Nikon D3000 and have two lenses. The one that came with my camera (a Nikon D3000 - 18-55mm f/3.5-5.6 VR lens) and then I have a 35mm 1:1.8G lens. I haven't ever used Lightroom before.
DeleteHope you have a fabulous weekend!
Can u do this in elements
ReplyDeleteI have never used Elements before but I am pretty sure it's supposed to be similar enough to CS5 that I would imagine so.
DeleteAwesome!! Maybe one day I'll have photoshop. :)
ReplyDeleteThis is why I love photoshop! Endless creativity!
ReplyDeleteThank you for your tutorial!
x
Maria
You would make a wonderful teacher for the Yearbook class in high school. My daughter would have achieved so much and continued using a camera with tutorials like this. Thank you so much for the step by step...I am sending this to her.
ReplyDelete-Monica
nice pics
ReplyDeleteBonjour,
ReplyDeleteJe viens de découvrir votre blog et je l'adore. Quelle élégance, quel raffinement. Vos filles sont magnifiques. Quel plaisir pour les yeux.
Mélanie (Paris)
I love using Photoshop but I haven't yet gotten into actions. Would you mind recommending which ones are your favorites or "must haves"? It seems that they cost money so I'd love recommendations before purchasing.
ReplyDeleteI really love the ones by Florabella, Paint the Moon, and Pioneer Woman. Pioneer Woman's are all free so I highly recommend starting with them first. And I love Florabella's Luxe II, and Paint the Moon's Miracle Makeover.
DeleteThank you, I will start with PW and move from there.
DeleteNicely done!
ReplyDeleteHey,
ReplyDeleteThis blog is very good.I love this information & Photoshop tutorial. Thanks for sharing this information.
Southwestern Kitchen
nice
ReplyDeletegood
ReplyDeletenice
ReplyDeletePhotoshop is an amazing image editing software to get better quality images. You have created the above final image from two different images brilliantly. I have learned this new technique from your blog. Thank you so much for your guidelines.
ReplyDeletePhotoshop is an amazing image editing software to get better quality images. You have created the above final image from two different images brilliantly. I have learned this new technique from your blog. Thank you so much for your guidelines.
ReplyDeletenice post
ReplyDeletegood
ReplyDeletenice
ReplyDeletegreat
ReplyDeletegood
ReplyDelete