


*** 6 pieces of wood. I used 1 by 4's. You will cut them in length in a range from 6.5" to 25.25" for the horizontal pieces of the tree to 38" for the vertical piece of wood.
*** 6 screws
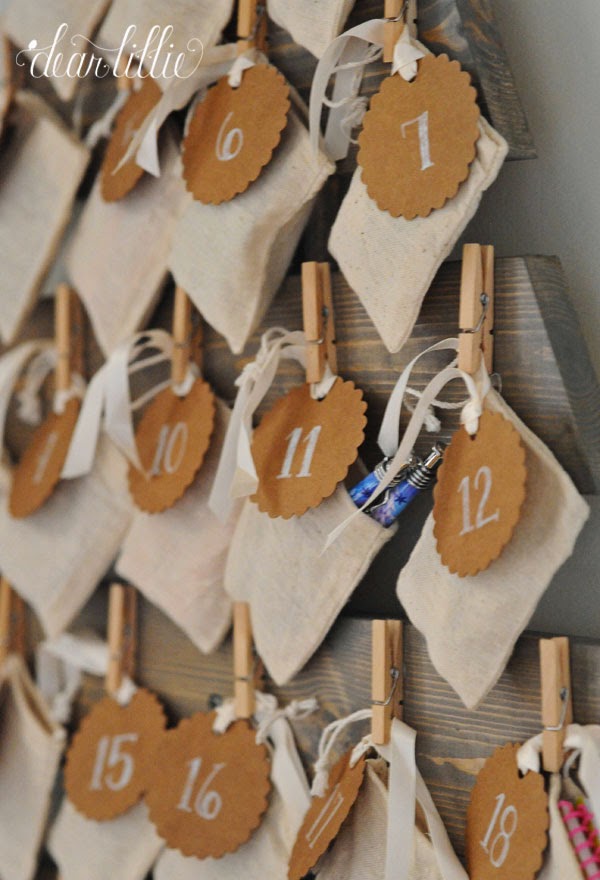
*** 25 mini clothespins (I got mine from Michael's)
*** 25 little bags and tags (I got mine from Michael's)
*** glue gun
*** some kind of star or tree topper (I found a star that was close enough in size at Michael's)
*** stain or paint (I used Rustoleum's weathered gray and then topped that with Minwax's provincial)

Then I cut each the end of those pieces at a 22.5 degree angle and laid them out on a vertical 38" tall board. I put them approximately 1.5" apart and then just added in one screw on the center of each board. I didn't worry about the fact that it would be visible because once the little bags go up they will hide the screws.

We also played around with adding a base. Although we didn't end up using it we did go ahead and paint the boards a weathered white (this picture was from before we painted them) so we can add the base at any point if we change our mind.

Then we stained it with one coat of weathered gray and one coat of provincial.

So once it is screwed together and stained here is what it will look like. (You can also see the measurements. The measurements for the horizontal boards are for the longest part of the board. Obviously the measurements for the top part of each board will be a little bit less).

After that we just used our glue gun to glue on each clothespin and then added the bags and little tags. We wrote the numbers 1 -25 on the little tags with a white paint pen.


We've been asking quite a bit about what we were putting in the little bags. The main purpose of this for us was to bring focus on the reason we celebrate Christmas and the story of Jesus's birth and include one verse in each bag. We've found several options for this by just googling it and so today's project is to actually print them out and add them to each bag. I am probably going to go either with this option or this one. We also included two little candies into each bag. One for each of the girls. Mostly chocolate kisses but a couple of bags have bite sized Reese's and then one bag each week has a little "prize". I actually didn't want to include any little "prizes" in the bags and wanted to just focus on the verses and have a little kiss in there for each of them but we have a few days this month that will be a little bit challenging so we decided on those days to have a little prize to make getting up those mornings a little more enjoyable.
Okay, that's it! I hope you all have a wonderful Sunday! We'll be back tomorrow morning with our Christmas house tour!

It's beautiful, Jenni! And such a great idea for the girls!
ReplyDeleteYour home(s) are absolutely beautiful. You have such a talent for creating a gorgeous liveable home you really should write a homekeeping / organising e-book. I, for one, would be your first customer. xoxo
ReplyDeleteVery cute idea.. It looks great!!
ReplyDeleteLovely! Thank you for the inspiring tutorial. Blessings
ReplyDeleteWhere did you find the very narrow foyer table? I have been looking everywhere for one!
ReplyDeleteHi! Its from HomeGoods.
DeleteLove this! Thanks for the great tutorial, I'm making one now! Did you do any wax or clear coat on the wood?
ReplyDeleteThank you! She didn't put anything on it after the stain.
Delete-Jason
What size bags did u use?
ReplyDeleteHi! Jenni didn't remember the exact size, but she thinks it was the only size they had at Michael's.
Delete-Jason
Did your hot glue actually stick to the stained wood? Mine all fell off, so I strung some twine to hold the clothespins, securing with staples on the back.
ReplyDeleteSo far Jenni's has stayed great through last December and again this year!
Delete-Jason
Dear Jennifer
ReplyDeleteCan you share with me what App you use to text on your pictures (Make your own advent tree) ??
Kind regards from Switzerland
Hi! Jenni uses Adobe Photoshop and Illustrator.
Delete-Jason
Hi! Jenni uses Adobe Photoshop and Illustrator.
ReplyDelete-Jason