


PLEASE NOTE: We do not have any affiliation with any printing companies mentioned in this post. There are many places to print large PDF files. The tutorial below is simply a guide to notify our readers and customers of the cheapest and easiest way that we have found to print 24x36 PDF files. This is the method we use to print our own chalkboard downloads. However, we cannot guarantee or stand behind the quality of another company's work--printing results will vary. Also, please be aware that a small number of Canadian customers have had issues uploading via this method.

Chalkboard art is everywhere these days! I am completely fascinated by it and want to keep playing around with it and try to get more creative with my lettering. I know there are a lot of people though, that enjoy it but don't necessarily want to spend hours working on just one quote so being able to download a chalkboard someone else has designed, print it out and pop it in a frame is a great alternative - especially if you like to change your art our seasonally or for different holidays. We just started offering our downloads a couple of weeks ago so only have a few options right now in our shop, but we have several more that are almost ready to go and a whole bunch more ideas in the works. Hopefully within a few more months we will have a wide variety for you to choose from for a whole bunch of different themes and events.
Anyway, I've been promising to show you how I've been swapping out the chalkboard prints in this frame for the past week or two and finally was able to get it all written up last night so here it is!
Here is what you need for this project:
1 24 by 36" chalkboard print
Painters Tape
4 pieces of wood for the frame ( to work with these prints I recommend using two 28" long pieces and two 33" long pieces)
1 large piece of wood (to work with these prints I recommend 24 inches by 36 inches)
chalkboard paint (optional)
stain (or paint) for frame
screwdriver
mending braces (I used 2" by 1/2" ones - there is a photo below of the exact ones I used)
screws (size 8 by 3/4 - I used a total of 6 - there is a photo below of the exact ones I used)
First, I am going to quickly show you how to upload the file online the Staples website. If you already know how to do that you can just scroll down and I will show the rest of the steps. We've gotten quite a few e-mails, though, asking how to do it so I thought it would be helpful to show step-by-step because it's hard explaining in an e-mail. I am sure there are other places that print engineering prints but I always use Staples. I actually don't use them for any of my other printed things, but for these engineering prints their price is great (a little over $3!) and it's easy to upload and then just go pick up the next day.


First, I am going to quickly show you how to upload the file online the Staples website. If you already know how to do that you can just scroll down and I will show the rest of the steps. We've gotten quite a few e-mails, though, asking how to do it so I thought it would be helpful to show step-by-step because it's hard explaining in an e-mail. I am sure there are other places that print engineering prints but I always use Staples. I actually don't use them for any of my other printed things, but for these engineering prints their price is great (a little over $3!) and it's easy to upload and then just go pick up the next day.
So, when you get to their website look on the left sidebar and find "Copy and Print" and then choose "Banners & Signs, Engineering Prints, and Oversized Prints":

That will bring you here and click on "Engineering Prints":

Once you are there select the 24 by 36 size (if you forget it's okay you will be able to switch it later) and then click on "Design Now":

Now click "Add Files":

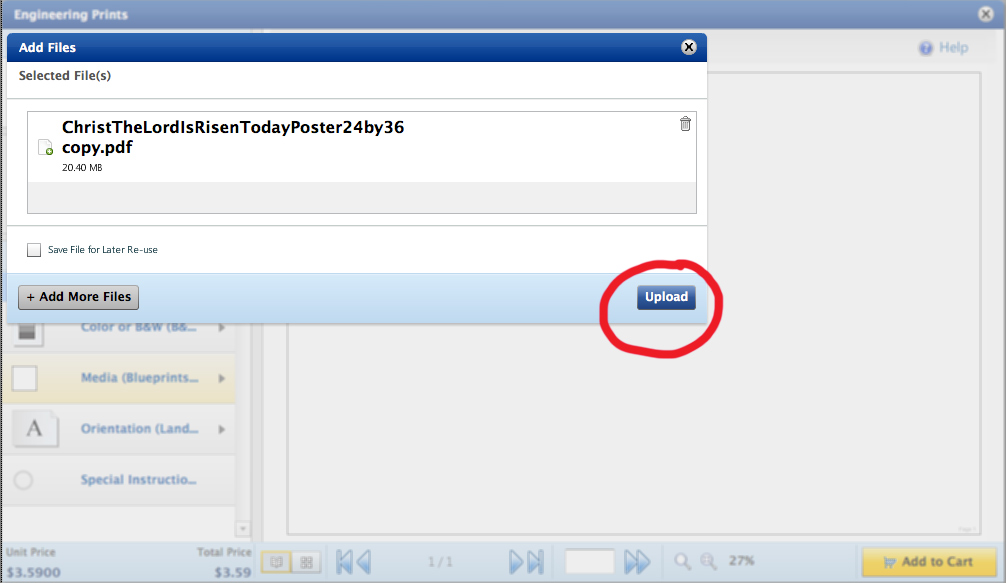
then click "upload files" and choose wherever it is you downloaded your PDF file too then just click on that file:

Once it shows up click on the upload button (this is one of our Easter ones that we hope to have ready to go early next week!):
Once it's loaded on the left side click Media and make sure you have the correct size and then click OK then click on orientation and make sure it's going the correct direction for the file you have uploaded. Then just add to cart and you are good to go! I always choose the option to "Pick up" vs. have it mailed to me and it will prompt you to choose the store nearest you. I didn't show those steps but they are easy enough to figure out.

Now that you have your print it's time to make your frame!
(some of the frame images are from our original make your own chalkboard tutorial).
Here are my boards. I had them cut to size at Lowe's. I used 1 by 4's
(which are actually about 3/4" by 3 1/2"). Make sure your board that is
going to be for the chalkboard is slightly larger than the size of your
frame opening.

The
first thing I did was paint my board with my chalkboard paint. PLEASE NOTE: this is not necessary if you only plan on using chalkboard printouts in this frame. Even though I already had two other framed chalkboards when I was making the new one sized for the prints, I still went ahead and painted the board with chalkboard paint so I would have the option of using it as a regular chalkboard later if I wanted to.

While your paint is drying you can put your frame together. Here are the braces I used.

Just
put the four pieces together and use the braces at each corner. I just
used one on each corner (for a total of four) because I was doing it
quickly. It was sturdier than I expected but if you wanted it to be
extra secure I would recommend doing two braces on each corner for a
total of eight.

Then either paint or stain your frame. I have made a few of these now and have stained two and painted two. So here is how it looks at this point (this is actually the first one I did not the most recent one as you can see from the Christmas tree in the background):

Now lay your frame down with the front side facing down:

Take your board and using painters tape (so that it can easily be removed without ripping the paper) start taping down the paper to the large board.

You can use as much or as little tape as you'd like. This is about how most of mine have looked:

Now flip it over and place it face down on the frame (I painted both sides of this board so I'd have more space to write new chalk art on):

Now
it's time to attach the board. These are the screws I had on hand.
There is probably something better you could use but they were the
right size and they worked fine. FOR THIS PROJECT I ONLY USED SIX and put them in relatively lightly if that makes sense.

I
just screwed them chalkboard onto the back of the frame. One in each corner and one in the middle of each of the longer sides. If you have a
drill it will make it a little quicker but it's still pretty easy with
just a good ol' screwdriver! This is an image from the tutorial a few months ago and for the permanent chalkboard so I screwed them in a little tighter. For this one (which I forgot to take a picture of) I did it a little looser so they'd be easier to quickly take out and just tape on a new print and pop the back right back into the frame. I have done it now about 6 or 7 times and it's really quick and easy!

I just leaned mine up
on my mirrored dresser but if you wanted to hang it you could always
attach something so it could be hung!
And that's it!


I hope you all are having a lovely week!

Thank you for the tutorial! Cannot wait to do it! Question though...for the frame did you mean to say you used 28 x 33?? It seems the 28 should be shorter or the chalkboard with print would be too small or am I missing something?? Thanks!!
ReplyDeleteThe measurements I gave are correct. =) I made extra sure because the last tutorial I had typed the wrong measurement for one side and did not want to make that mistake again. I even now just got up before typing this reply to confirm that it was indeed 28" and it is! The 28" piece is the one that goes on the top and bottom and as you can see from the photos the 33" goes in between those pieces. Keep in mind that because those 33" ones are underneath (and on top) of the 28" boards they reduce the inside of the frames width by 3 1/2" on each side for a total of 7 inches. That means the outside of the frame is 28" wide (therefore the 28" piece of wood) but the interior part where you place the print is actually only 21" wide which gives you some wiggle room when you are placing your 24" print, if that makes sense. It's hard to explain with words but if you look at the photos I think it will make sense.
DeleteI love your quotes. I can tell you that most Staples will NOT do the blueprints any longer because of the amount of toner that is used to print these out and Xerox has told them not to do it any longer. Too many Pintrest ideas have been coming to the stores and I know that alot of them will not print them out.
DeleteThanks, Erin. We have sold thousands of these now and only had two customers say their Staples wouldn't print them but they were able to order them through Staples online so it worked out just fine.
DeleteHave a blessed week!
Warmly,
Jenni
fantastic. what color and brand stain did you use? it's PERFECT
ReplyDeleteThanks! I used tea first and then some of that homemade stain using vinegar and steel wool!
DeleteCould you give a tutorial on your stain? I was going to ask the same questions as AntiqueChase... the color is a perfect combination of honey and antique.
DeleteCould you give a tutorial on your stain? I was going to ask the same question as AntiqueChase... your color is the perfect combination of honey and antique that I have been looking for.
DeleteThanks for the tutorial. Just wondering, do the screws go through the print so that it has holes when you remove it?
ReplyDeleteYes, the screws will go through the print but that is all hidden behind the frame so you don't see any holes. When you want to swap one out you can just roll up the one you are removing and store it and then still use it again in the frame at another time. I have all 7 or 8 that I have done so far saved and I can pop them all in and out whenever I want to make a switch!
DeleteAwesome tutorial! Thank you Jennifer & your darling little helper.
ReplyDeleteAwesome tutorial! Thank you Jennifer and your darling little helper.
ReplyDeleteExcellent tutorial! Thank you! I've been debating about what to put on one wall of our dining room, and I think this will be it!
ReplyDeleteHey Jenni! Nice tutorial! I just picked up my wonderful world print this morning! MG and I found the trick to making the trip more enjoyable-a stop at the donut shop afterwards. :) Have a great day!
ReplyDeleteHaha! I've bribed Lola with Dunkin Donuts a few times after our trips there too! Or maybe it's more because I just need a good old Boston Creme myself! =) Would love to see how your print turned out!
DeleteI commented in a hurry and completely left out the fact that the print looks fantastic-thank you! I'll show you how it turns out. Now I have to decide if I use an antique frame that I already have or make one like yours, which I love. I'm need to stop dragging my feet!
DeleteI must be dense, but do you just leave the chalkboard print out on top of the board taped to it, or do you actually trace it onto your own chalkboard? I can't figure out if I'm missing a step? Thanks.
ReplyDeleteYes, these are designed for you to display as a print. Obviously they are not the same as a "real" chalkboard but it sure it a TON quicker! (And my husband didn't believe me when I told him the first time that it was a print not the original design.) Once you get up really close you can tell but even a short distance away they look pretty much like a chalkboard.
DeleteIf you really want to draw one yourself you could probably download one of our prints and use that method where you rub chalk on the backside of the print and then tape it to the chalkboard and trace over the design. I have not ever used that method before but I've seen some other bloggers and on pinterest where people have done that. Just being able to print and frame this though makes it a lot quicker! =)
All of the images shown in the post above are of the prints - not a single one of them is a "real" chalkboard. I did design each one of them originally in chalk (there are older posts for each design where you can see the original chalk art) and that's how the designs are created but these photos all show the prints.
DeleteWow...I came here to see what you were up to today and got so much more! I clicked on your link for you downloads as I want to order the "I love you to God and back." BBH...I then clicked on Blake's story. I watched the video as our oldest is at preschool and our baby is napping. I can't imagine what your family has been through...what a beautiful tribute that was and it has made me think.
ReplyDeleteI wanted the to God and back...because we are a family of faith and I liked it. But, knowing now the real meaning behind it for you...will bring and added bit of special to it in our home. I have the perfect spot and a huge frame I am working on right now!
Thank you for sharing...I have followed you for a very long time and LOVE your style!
Julie
Thank you for your sweet note, Julie! We miss him so very much!
DeleteI just downloaded "I love you all the way to God & back"! SOOO excited get this displayed! The nearest print store to me wanted $89! Went to the Staples site, ordered it exactly as you had described (thank you for that!), only cost me $3.59. I was planning to just have it shipped but found that they have a store within 30 miles! Yay! Will be picking up my print tomorrow & by the end of the weekend it will proudly greet everyone as they come in the door! Thank you, thank you, thank you!
ReplyDeleteYikes - $89? That's crazy! So glad you were able to find another store! I hope you will be happy with it!
DeleteThanks for the tutorial Jennifer...you are so generous to offer the downloads....will you be offering the "Irish" quote in a print..?
ReplyDeleteYou're welcome, Sherry! Yes, we blogged about and listed the Irish prints earlier in the week. They sold out pretty quickly but we will have more next week. We have them ready we are just waiting on more shipping supplies!
Deletehttp://www.dearlillie.com/product/irish-eyes-11x14-chalkboard-print
Your chalkboard art is always beautiful! Thanks for sharing how easy it is for us to have it too now:)
ReplyDeleteWhen you showed the antique frame you had used, how did you frame it so it could be temporary?
ReplyDeleteFor that frame and really any regular sized frame you just turn the frame over and pop the print in and out of the frame just like you would any regular photo.
DeleteAWESOME. Will you be doing an irish blessing one? Just what i was looking for.thanks
ReplyDeleteThanks! This year we will just be doing that one Irish one but maybe next March!
DeleteHi! I have been following your blog and just love your style and your cheerful personality! I was wondering if you will be doing some prints for graduations and perhaps weddings?? That would be awesome if you do! I'm going to try printing your download for the first time, I usually do them myself, but they take forever and never look as good as yours! Thanks for the inspiration!
ReplyDeleteBlessings,
Pam
Hello Pam! Thanks so much for your e-mail! We do currently have one download that would be good for a wedding (Whatever souls are made of...) http://www.dearlillie.com/product/whatever-souls-are-made-of-24x36-chalkboard-download and have several more that we plan on doing. As far as graduation ones go I am considering doing one but haven't come up with anything I am happy with and so am not sure I will have one in time for this year's graduation season. I love doing the chalkboards though and have a lengthy list of designs so we hope to be offering at least two new ones each month for a long long time! =)
DeleteI hope you have a blessed weekend!
Warmly,
Jenni
What a great post. Can hardly wait to make my own version.
ReplyDeleteGood morning! I have just found u on pinterest and am blown away at ur beautiful talent and pieces. I love chalk board paint but always seem to have a grain like finish instead of smooth. Any chance u might share what you use whether roller or paint brush to get such a pretty finish? Many many thanks and thank u for sharing ur work! Chrissi
ReplyDeleteThank you so much, Chrissi! You are so sweet. I always use a roller and sometimes I get a pretty smooth finish and sometimes I get a bit of grain which is annoying but just part of what comes with making a homemade chalkboard I guess.
DeleteI love this tutorial!!! Thank you, the site is one of my favorites.
ReplyDeleteDo you print with the color option or BW only option?? Does it matter?
ReplyDeleteDo you print in color or BW only from Staples? Does it matter? Thanks!! : )
ReplyDeleteI purchased a chalkboard download only to find out that no Staples in my area will print this size for $3. They want to charge $40 due to the amount of toner being used.
ReplyDeleteThank you so much for your purchase! I am so sorry they won't print it for you. We've sold thousands of these and only had a couple of people say their Staples wouldn't print them - if your local Staples won't print it you can choose the shipping option. They charge $9 or so to ship but that should put the total around $12-$13 which is still a great price for such a huge print. If you have any trouble just send us an e-mail at dearlillie@hotmail.com and we'll be glad to help.
DeleteHelp. I would like to make a frame that would fit an 8x10print. I can't figure out what size to cut the wood. Any help you could give me would be greatly appreciated. I love your print and frame. Thank you.
ReplyDeleteSorry, Sharon! We just saw this now! It would depend on the width of the wood you were using.
DeleteHi there, I was really interested to check out the staples website (thanks for your detailed instructions!) but am feeling a bit stupid because I can't see the print and copy centre?
ReplyDeleteDo Staples still offer this service?
Thanks in advance!
Hi, Melyssa! It is under their "services" tab.
DeleteI know this post is over a year old, so I don't know if you'll respond, But...I'm curious what program you use to make these. I use photoshop elements, and have created some chalkboards myself. I'm not exactly sure how to save such a large size as a pdf. One question you might can answer, when I upload the pdf to Staples, will it show white around the picture? It looks like there will be a white border on it, even though I didn't put one there. I just can't seem to figure this out.
ReplyDeleteCan the download be resized? I want this print for my grand daughters nursery but not sure if a print this large would work in such a small room. Thank you.
ReplyDeleteTechnically can resize PDF's with any basic photo or file editor without reducing the quality, but you will need some knowledge of how to use the program. Also keep in mind that the dimensions are 24x36 (2:3), so you will want to keep the ratios the same if you make the file smaller or larger. With any image, not just our artwork, changing the length and width ratio will either distort the image or leave letter marking. For the best quality though we would recommend printing them at a local print shop at their designed size.
DeleteVery interested in making some signs for our wedding in the spring. So after you pick up your print from staples, I'm having a hard time understanding how you transferred your print to the back of the frame? Can you further explain? Does the print come on clear paper or are you somehow transferring the print over to the chalkboard backing you painted?
ReplyDeleteHi! These are just regular printed artwork. Once printed, they appear exactly how you see them in the photos (black "chalkboard" background, white "chalk" text, ect.)!
DeleteI am very interested in making some of these sign for our wedding in the spring! Can you further explain how you transferred the print onto the backing of the chalkboard you painted? Im having a hard time understanding how you transferred it over. Did the print come see through and you just taped into on the backing or does it have to be traced and transferred over? Sorry, I am very confused how this works. Thanks
ReplyDeleteso can you just print these with a normal printer in smaller size? do you use special paper?
ReplyDeleteTechnically can resize PDF's with any basic photo or file editor without reducing the quality, but you will need some knowledge of how to use the program. Also keep in mind that the dimensions are 24x36 (2:3), so you will want to keep the ratios the same if you make the file smaller or larger. With any image, not just our artwork, changing the length and width ratio will either distort the image or leave letter marking. For the best quality though we would recommend printing them at a local print shop at their designed size. We have never printed them from a home printer, so we don't have any recommendations for paper.
Deleteso can you just print these with a normal printer? do you use special paper?
ReplyDeleteHave you ever mod podge'd a chalkboard print onto a canvas? I'm wondering how it would turn out....I would love to do that with some of the great printables out there
ReplyDeleteHi there! Unfortunately we have never tried that so we don't have any tips or tricks :(
DeleteQuick question....can any printable you find online be made into this size? I see some blogs show that you can print to a 5x7 or 8x10, but most do not specify a size...
ReplyDeleteFinally I get a very useful tutorial .
ReplyDeleteThis may be a silly question but is it possible to print them smaller? I have a chalkboard the same style as yours but the space is is 15x24.
ReplyDeleteTechnically you can resize PDF's with any basic photo or file editor without reducing the quality, but you will need some knowledge of how to use the program. Also keep in mind that the dimensions are 24x36 (2:3), so you will want to keep the ratio the same if you make the file smaller or larger. With any image, not just our artwork, changing the length and width ratio will either distort the image or leave letter marking. For the best quality though we would recommend printing them at a local print shop at their designed size.
DeleteCan you provide more detail on how you fasten the backing to the boards? I don't want to make a big whole in my poster. Is there another suggestion you have to secure the poster to the boards? If not, can you explain a little more on how you go about fastening it?
ReplyDeleteWe don't have a Staples anywhere near us and I can't find equivalent printing options on the Fedex/Kinkos site. Do you know if they do offer it as well, or have another recommendation?
ReplyDeleteWhat is the thickness of the board that you used?
ReplyDeleteJust wondering. Have you tried placing glass on the front to p protect the paper? Or would it not look like chalkboard?
ReplyDeleteHi! We have never done that before, as the sheen would probably minimize the chalkboard look.
Delete-Jason
My Staples was not happy that I requested an engineered print, but did it anyway. And I have to say it didn't look good. We ended up spending the extra $25 to have it printed out like a poster. Engineer prints were designed for blue prints, and too much toner is used, which they don't like to do, as was expressed to us today, as well as the print coming out full of white lines. I will say that I am very happy with out it is now though, and will purchase more downloads in the future. :)
ReplyDeleteI had the same issue at my Staples store. There are white lines across the entire bottom of the print as you would see in a bad xerox copy. My Staples also said they have been told my corporate not to print downloads like this as engineering prints because of the way it turns out. The actual artwork by Dear Lillie is gorgeous. Just know for descent quality you are going to have it printed as a poster (more expensive) not an engineering print.
ReplyDeleteThank you for sharing that. I was just getting ready to order one, so when I get mine printed I will go with the poster. Did you print in black & white or in color?
DeleteDo I select the black and white print option or the color print option?
ReplyDeleteWe can print literally anything, on a huge variety of papers and sizes. We list the most commonly Printing quote on our site, but there’s a lot more that we can do. So give it a shot – tell us about what you are looking for and we’ll get to work on a printing quote just for you.
ReplyDeleteCan I possible have it printed and mounted at Staples? And in a smaller size even though I purchased the 24 x 36?
ReplyDeleteHi! I'm not sure if Staples offers mounting, but you may be able to find out on their website. Technically you can resize PDF's with any basic photo or file editor without reducing the quality, but you will want to keep the width:height ratio the same so it doesn't get distorted.
Delete-Jason